Manage ComfyUI on Olares
ComfyUI Launcher is the primary management tool for ComfyUI administrators. Use it to control the ComfyUI service across the cluster, and manage models, plugins, the runtime environment, and network settings.
Some model-related actions, such as downloading missing models from the Errors tab in the ComfyUI client, are completed outside ComfyUI Launcher. This guide walks you through both Launcher-based tasks and related in-client workflows.
Learning objectives
In this guide, you will learn how to:
- Start and stop the ComfyUI service for all users in the cluster.
- Verify and adjust network settings so GitHub, PyPI, and Hugging Face are accessible.
- Add models in different ways and understand where models are stored in Olares Files.
- Manage plugins from the ComfyUI Launcher library or install them from GitHub.
- Manage Python dependencies by installing, updating, removing packages, and analyzing missing dependencies for plugins.
- Troubleshoot common issues by checking dependency conflicts, resetting ComfyUI, reinstalling it, and collecting diagnostic information for support.
Start and stop the service
As the administrator, you must start the ComfyUI service before you or other members can access it via the client interface.
Start ComfyUI service
Go to Home and click the START button in the upper-right corner.

Notes on first run
- Initial startup of ComfyUI Launcher typically takes 10-20 seconds for environment initialization.
- If the system prompts that essential models are missing, you can click START ANYWAY. However, workflows may fail without these base models. Download the required models before starting the service.
Stop ComfyUI service
Go to Home and click the STOP button when ComfyUI is not in use. This releases VRAM and memory resources for other applications.

Configure network
ComfyUI needs access to GitHub for plugins, PyPI for Python packages, and Hugging Face for models. Before installing any of these, check the connection status in Network Manager.
Go to Network.
Check the connectivity to GitHub, PyPI, and Hugging Face.
If any service shows
Inaccessible, fix your network or proxy settings, and then click SAVE & CHECK to test again.
Repeat until the status of each service becomes
Accessible.

Manage files and directories
ComfyUI Launcher provides quick access to key directories and uses a shared model folder so models can be reused across ComfyUI and SD Web UI.
Access file locations
On the Home tab, the File Type section provides direct access to the main directories used by ComfyUI:
| Entry | Location in Files | Description |
|---|---|---|
| Root | /Files/External/olares/ai/comfyui/ComfyUI | Root directory of the ComfyUI installation. |
| Plugin | /Files/External/olares/ai/comfyui/ComfyUI/custom_nodes | Stores installed plugins (custom nodes and extensions). |
| Model | /Files/External/olares/ai/model | Centralized storage for AI models shared by ComfyUI and other AI apps. |
| Output | /Files/External/olares/ai/output/comfyui | Default destination for images and other assets generated by ComfyUI. |
| Input | /Files/External/olares/ai/comfyui/ComfyUI/input | Folder for source images used in image-to-image or in-painting workflows. |
Clicking any of these entries opens the Files app directly in the corresponding directory.
Understand the model directory structure
ComfyUI in Olares uses a file structure that differs from the standard installation. This change allows models to be shared between ComfyUI and SD Web UI.
When uploading external models manually or selecting a destination in Custom Download, place files into the correct subfolder.
TIP
Make sure the model type matches the target folder so ComfyUI can detect and use the files correctly.
| Standard ComfyUI directory | Directory in Files | Model type |
|---|---|---|
checkpoints/ | main/ | Base checkpoints (SD 1.5, SDXL, Flux) |
loras/ | lora/ | LoRA weights |
vae/ | vae/ | VAE models |
embeddings/ | embeddings/ | Textual Inversion embeddings |
hypernetworks/ | hypernetworks/ | Hypernetwork weights |
controlnet/ | controlnet/ | ControlNet models |
clip_vision/ | clip_vision/ | CLIP Vision models (used for IP-Adapter) |
style_models/ | style_models/ | Style or effect models |
upscale_models/ | upscale_models/ | Upscalers (ESRGAN, SwinIR) |
ipadapter/ | ipadapter/ | IP-Adapter models |
facerestore_models/ | facerestore_models/ | Face restoration models (GFPGAN, CodeFormer) |
inpaint/ | inpaint/ | Inpainting-specific models |
text_encoders/ | clip/, text_encoders/ | Text encoder models (for example, CLIP and T5 encoders) |
diffusion_models/ | unet/, diffusion_models/ | Diffusion model weights, including UNet-based models |
Manage models
ComfyUI supports multiple ways to add models. Choose the method that best matches the model source and your workflow.
| Method | Best for | Notes |
|---|---|---|
| Download with ComfyUI Launcher | Public models, resource packages, or direct model URLs that do not require login, access approval, or a token. | The easiest way to download standard models directly to Olares. |
| Use Server Download | Missing models listed in the ComfyUI client with a direct downloadable URL. | Downloads directly to the Olares host. Does not support models that require login, access approval, a token, or other authorization. |
| Use from Library | Missing models where you already have a compatible alternative installed. | Uses models from External/olares/ai/model. No download required, but you need to verify compatibility yourself. |
| Upload local models | Restricted models that require login, access approval, a token, or manual download, or models from unsupported sources. | Download the file to your local device first, then upload it through Files or LarePass. |
| Use downloader nodes | Custom nodes that provide their own built-in model downloaders. | Follow the node documentation. Setup, storage location, and requirements may vary by node. |
Download with ComfyUI Launcher
Use this method for public Hugging Face models that do not require login or a token.
ComfyUI Launcher provides three common ways to download models directly to Olares.
Download a resource package
Use this method when you want to install a ready-to-use package provided by Olares, such as a starter bundle or a workflow-specific package.
Go to Home > Resource Package.
Find the package you want, then click VIEW.
On the Package Details page, click GET ALL to download all required files. You can track the progress in the status bar.

Download from the model library
Use this method when you want to download an individual public model directly in ComfyUI Launcher.
Go to Models > Model library, then scroll to Available models.
Search for the model by name, or browse by category.
Find the model you want, then click the download button to download it.

Download by direct URL
Use this method when you already have a direct download URL for a model file that ComfyUI Launcher can access directly.
Go to Models > Custom Download.
Paste the model URL.
Select the destination path based on the model type. If you're not sure which folder to choose, see Understand the
modeldirectory structure.Click DOWNLOAD MODEL.

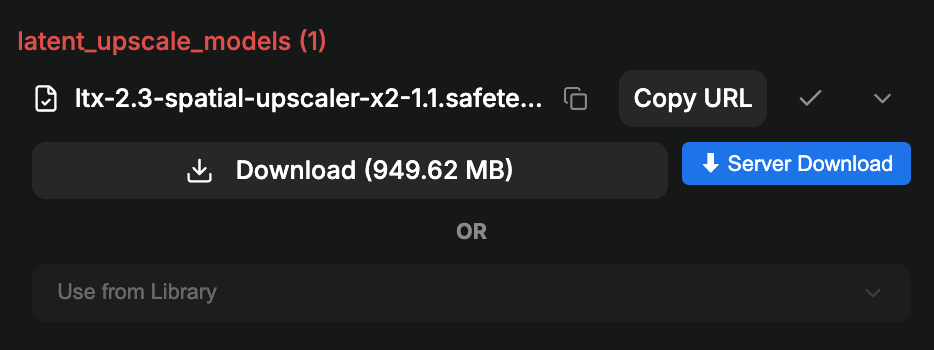
Use Server Download
Use this method to download missing models directly to the Olares host from the ComfyUI client.
INFO
Server Download is a ComfyUI plugin enabled by default in ComfyUI 1.0.32 and later.
It supports only model URLs that can be accessed directly without login, access approval, or other authorization. For restricted models, upload them manually.
To turn off this feature, see Disable Server Download.
In the ComfyUI client, click an empty area on the canvas to open Workflow Overview. Then, select the Errors tab and find the Missing Models section.
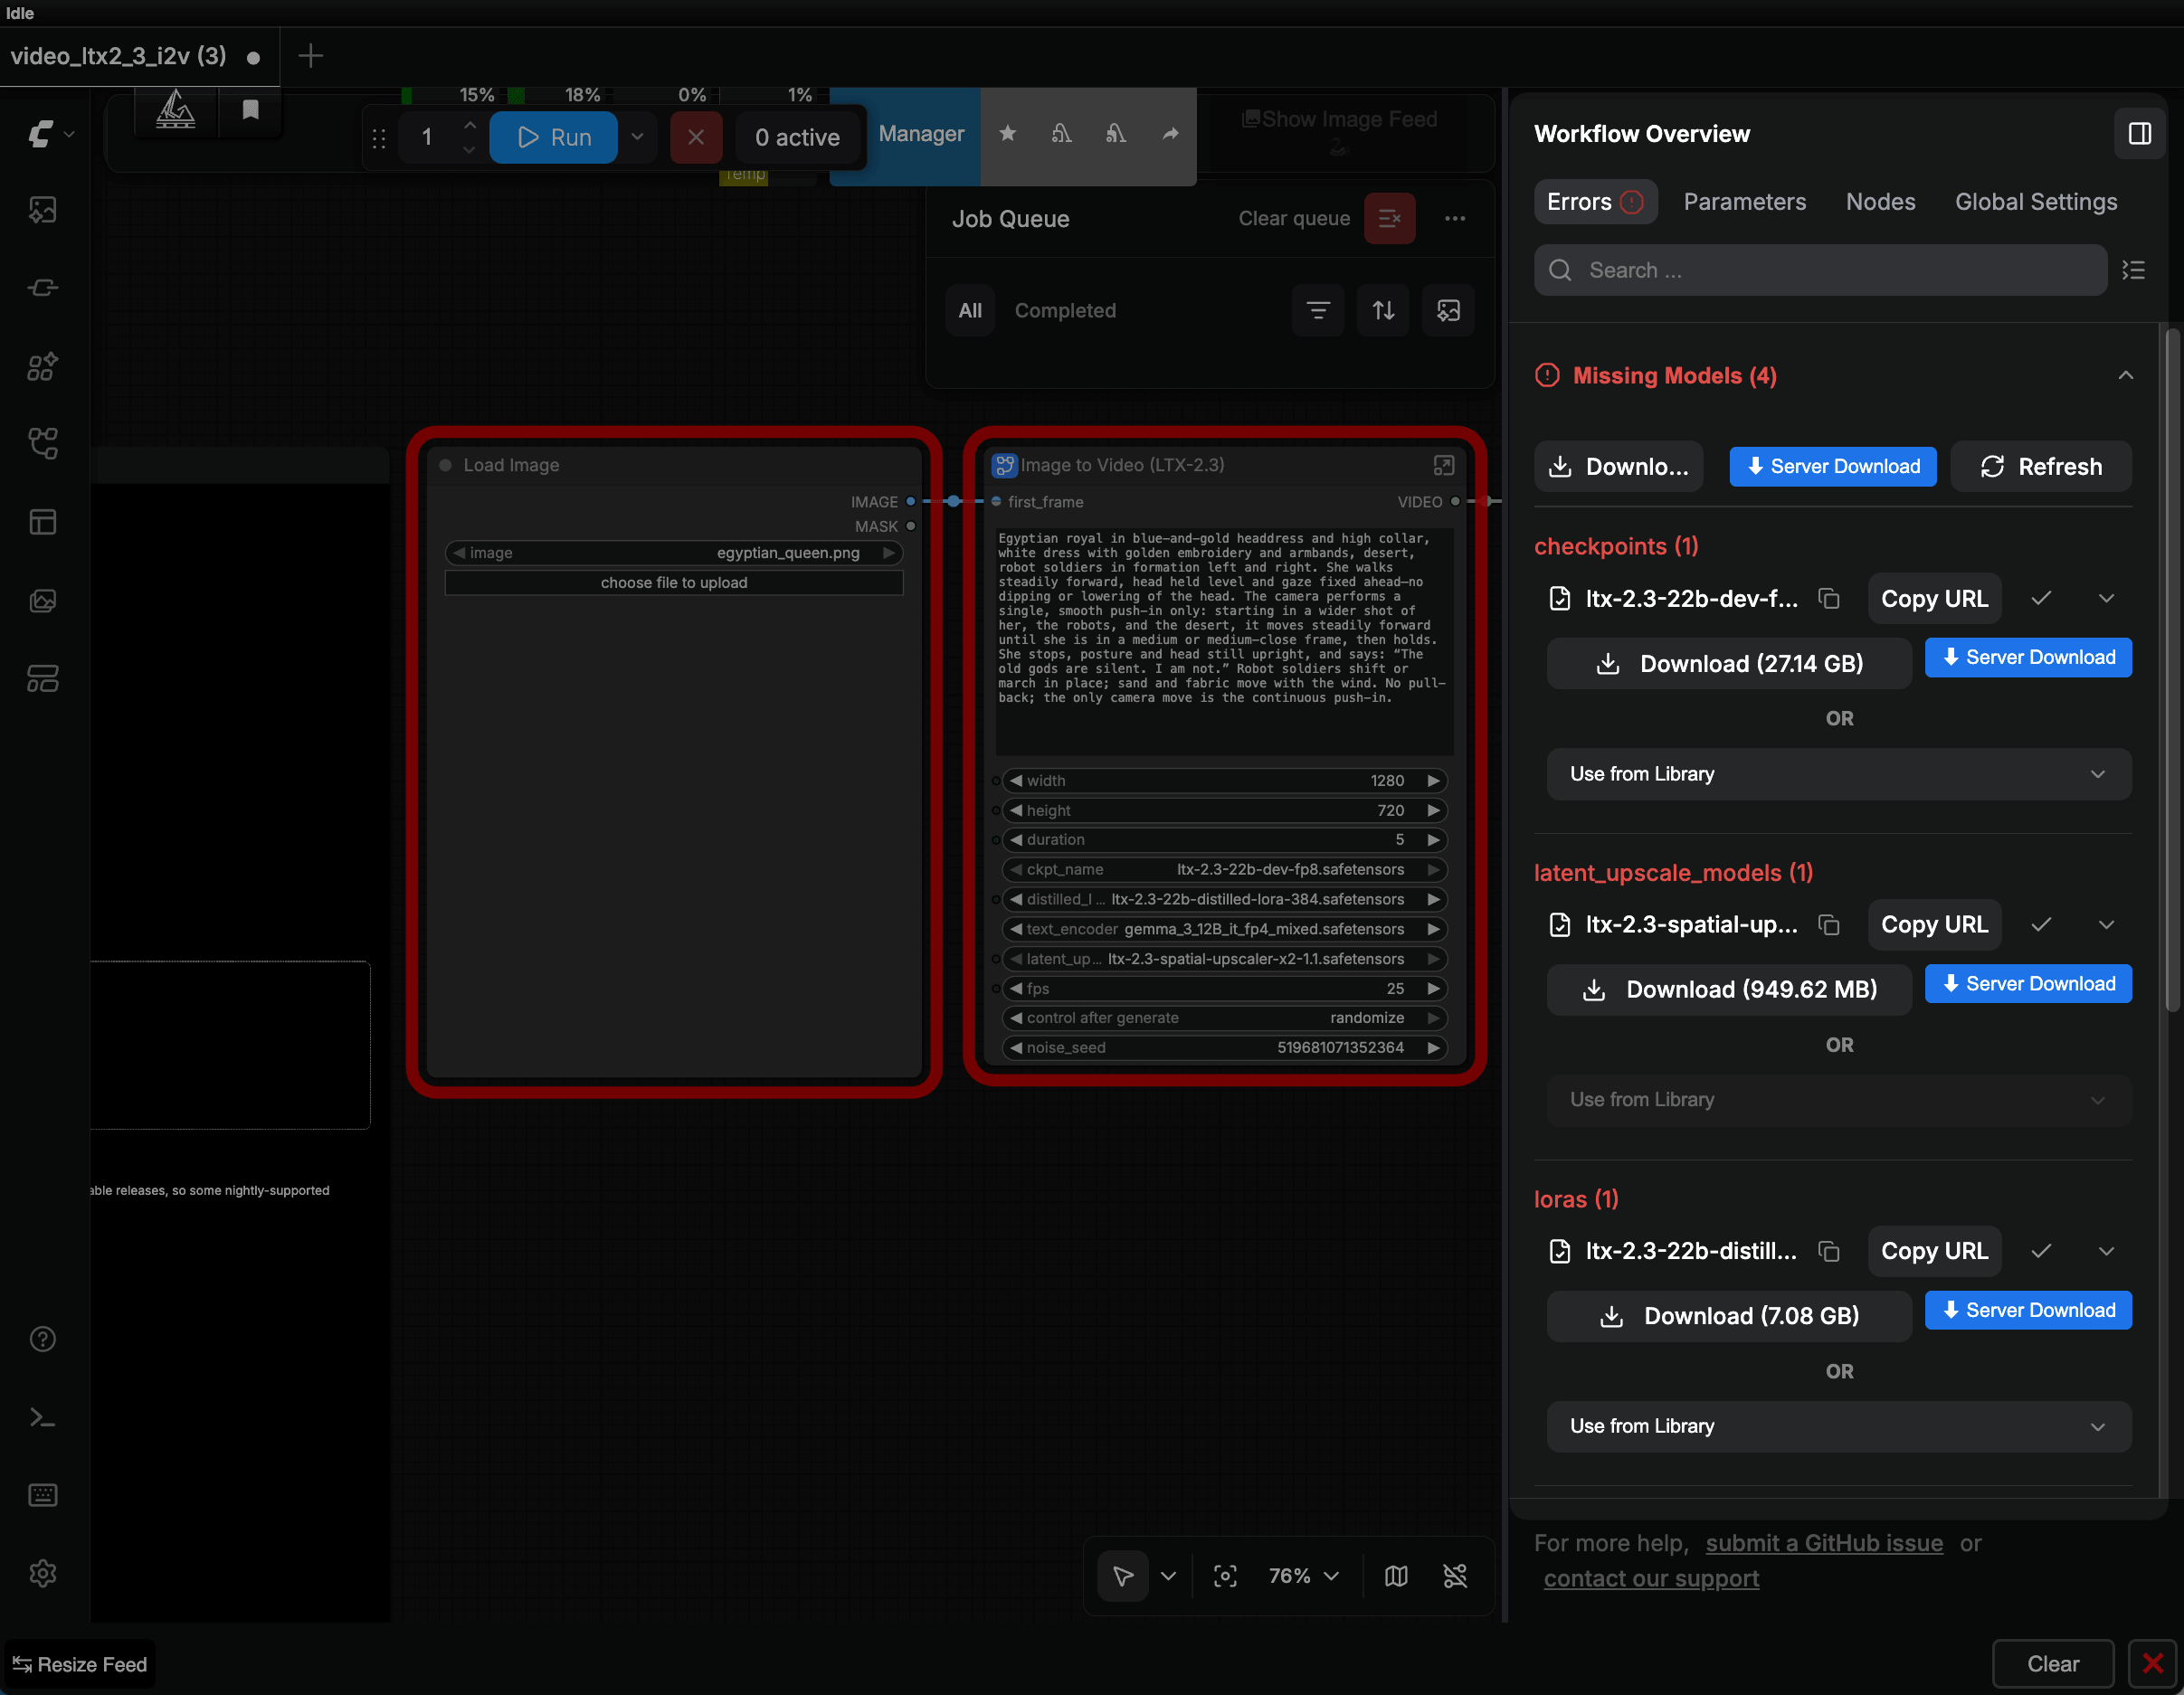
Find the required model in the list, click Copy URL, then click Server Download.
Server Download reads the URL from your clipboard. Do not copy other text between these two actions.
If this is your first time using Server Download, the browser asks for permission to read from the clipboard. Click Allow.
In the download dialog, verify the auto-filled information:
- URL: If the URL is incorrect, clear the field and paste it manually.
- File Name: Click Auto to detect and fill the file name.
- Model Type: Make sure it matches the category shown in Missing Models, such as
checkpoints,loras, ordiffusion_models.
Verify the model type
The auto-detected Model Type may be incorrect. If the workflow includes an on-canvas note with model storage locations, use it as an additional reference. Models saved to the wrong folder will still be reported as missing.
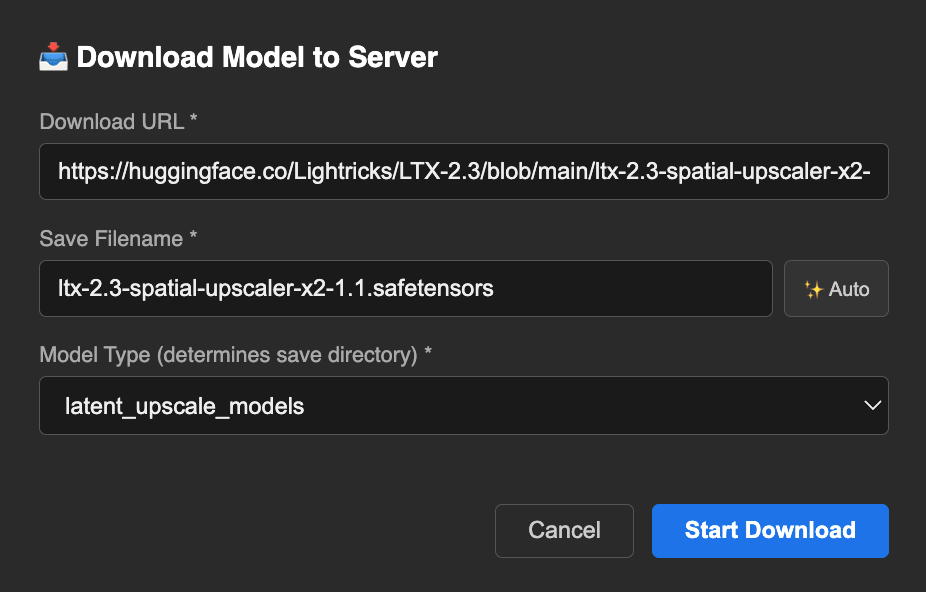
Start the download and wait for it to complete.
Server Download does not currently support pausing, resuming, or retrying downloads. If a download fails, start a new download task.
Once the download is complete, refresh the ComfyUI page. You can now use the model in your workflow.
To verify or manage downloaded files, open Files and go to the corresponding subfolder under External/olares/ai/comfyui/ComfyUI/models.
Use existing models from library
Use this method when a workflow reports a missing model, but you already have a compatible alternative in the model library.
Use from Library lets you select models from External/olares/ai/model. The button is available only when the corresponding model-type folder exists and contains model files.
In the ComfyUI client, click the empty area in the canvas to open the Workflow Overview, then go to the Errors tab and locate the Missing Models section.
Under the missing model, click the Use from Library dropdown.
Select an existing model from your local storage to replace the missing one.
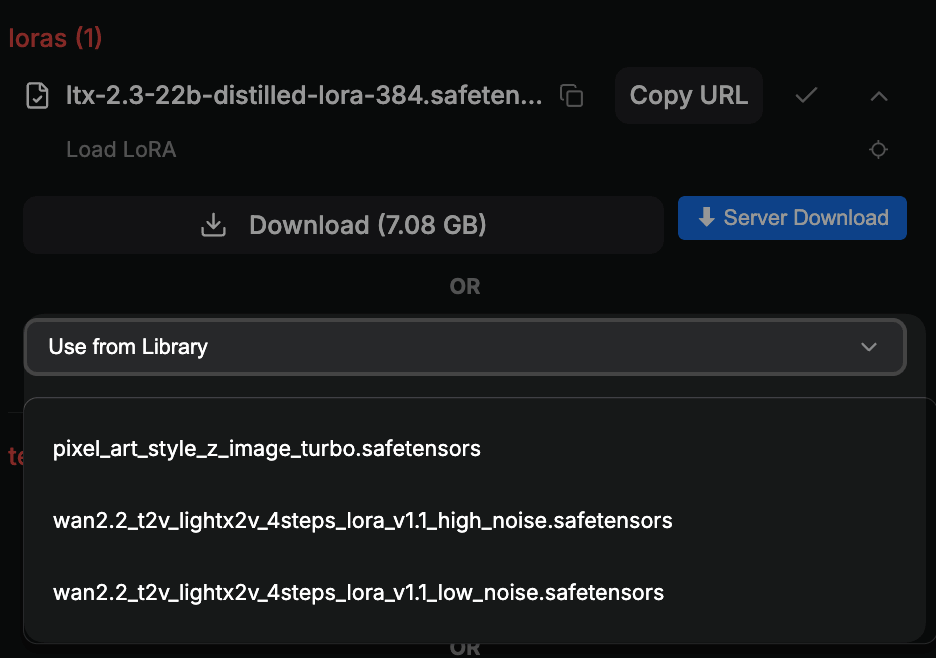
Evaluate compatibility
You must evaluate model compatibility yourself. Selecting an incompatible model will cause the workflow to fail or produce unexpected results.
Use downloader nodes
Some custom nodes can download models automatically.
Follow the documentation provided by the node author for setup, storage location, and model requirements.
If the workflow still reports a missing model after download, check whether the file was saved to the expected location and whether it matches the model type expected by the workflow.
Upload local models
Use this method when the model requires login, a token, approval, or manual download, or when the model source is not supported by ComfyUI Launcher or Server Download.
- Download the model file to your local device. If needed, see Models cannot be downloaded directly to Olares.
- Open Files from the Launchpad.
- Navigate to
External/olares/ai/model. - Open the folder that matches the model type. If you're not sure which folder to use, see Understand the
modeldirectory structure. - Upload the model file to the target folder.
Delete models
To delete a model:
Go to Models > Model library.
Under the Installed models section, find the model you want to delete, and click the delete icon.

Manage plugins
ComfyUI Launcher provides flexible ways to manage plugins in Plugins.

Manage available plugins
To manage available plugins registered in ComfyUI Launcher:
- Go to Plugins > Plugin library.
- Under Available Plugins, find the plugin you want.
For any plugin, you can:
- Click the visibility button to view plugin details.
- Visit the GitHub repository if it is available.
Depending on the plugin status, different actions are available:
- Not installed: Click Install to get the latest version, or Switch version to choose a specific one.
- Installed: Disable, Uninstall, or Switch version.
- Disabled: Click Enable to reactivate it, or Uninstall to remove it.
At the top of the section, you can also:
- Click UPDATE ALL PLUGINS to update all installed plugins.
- Click REFRESH to refresh the plugin list.
Install plugins from GitHub
To install plugins directly from GitHub repositories:
Go to Plugins > Custom Install.
Enter the GitHub repository URL of the plugin.
(Optional) Specify the branch. If unsure, keep the default.
Click INSTALL PLUGIN.

Disable Server Download
The Server Download button in the ComfyUI client is provided by the comfyui-server-downloader plugin, which is enabled by default in ComfyUI 1.0.32 and later.
To disable it:
In ComfyUI Launcher, go to Plugins > Plugin library.
Under Available Plugins, search for
server-download.In the
comfyui-server-downloaderrow, click the dropdown arrow in the Actions column and select Disable.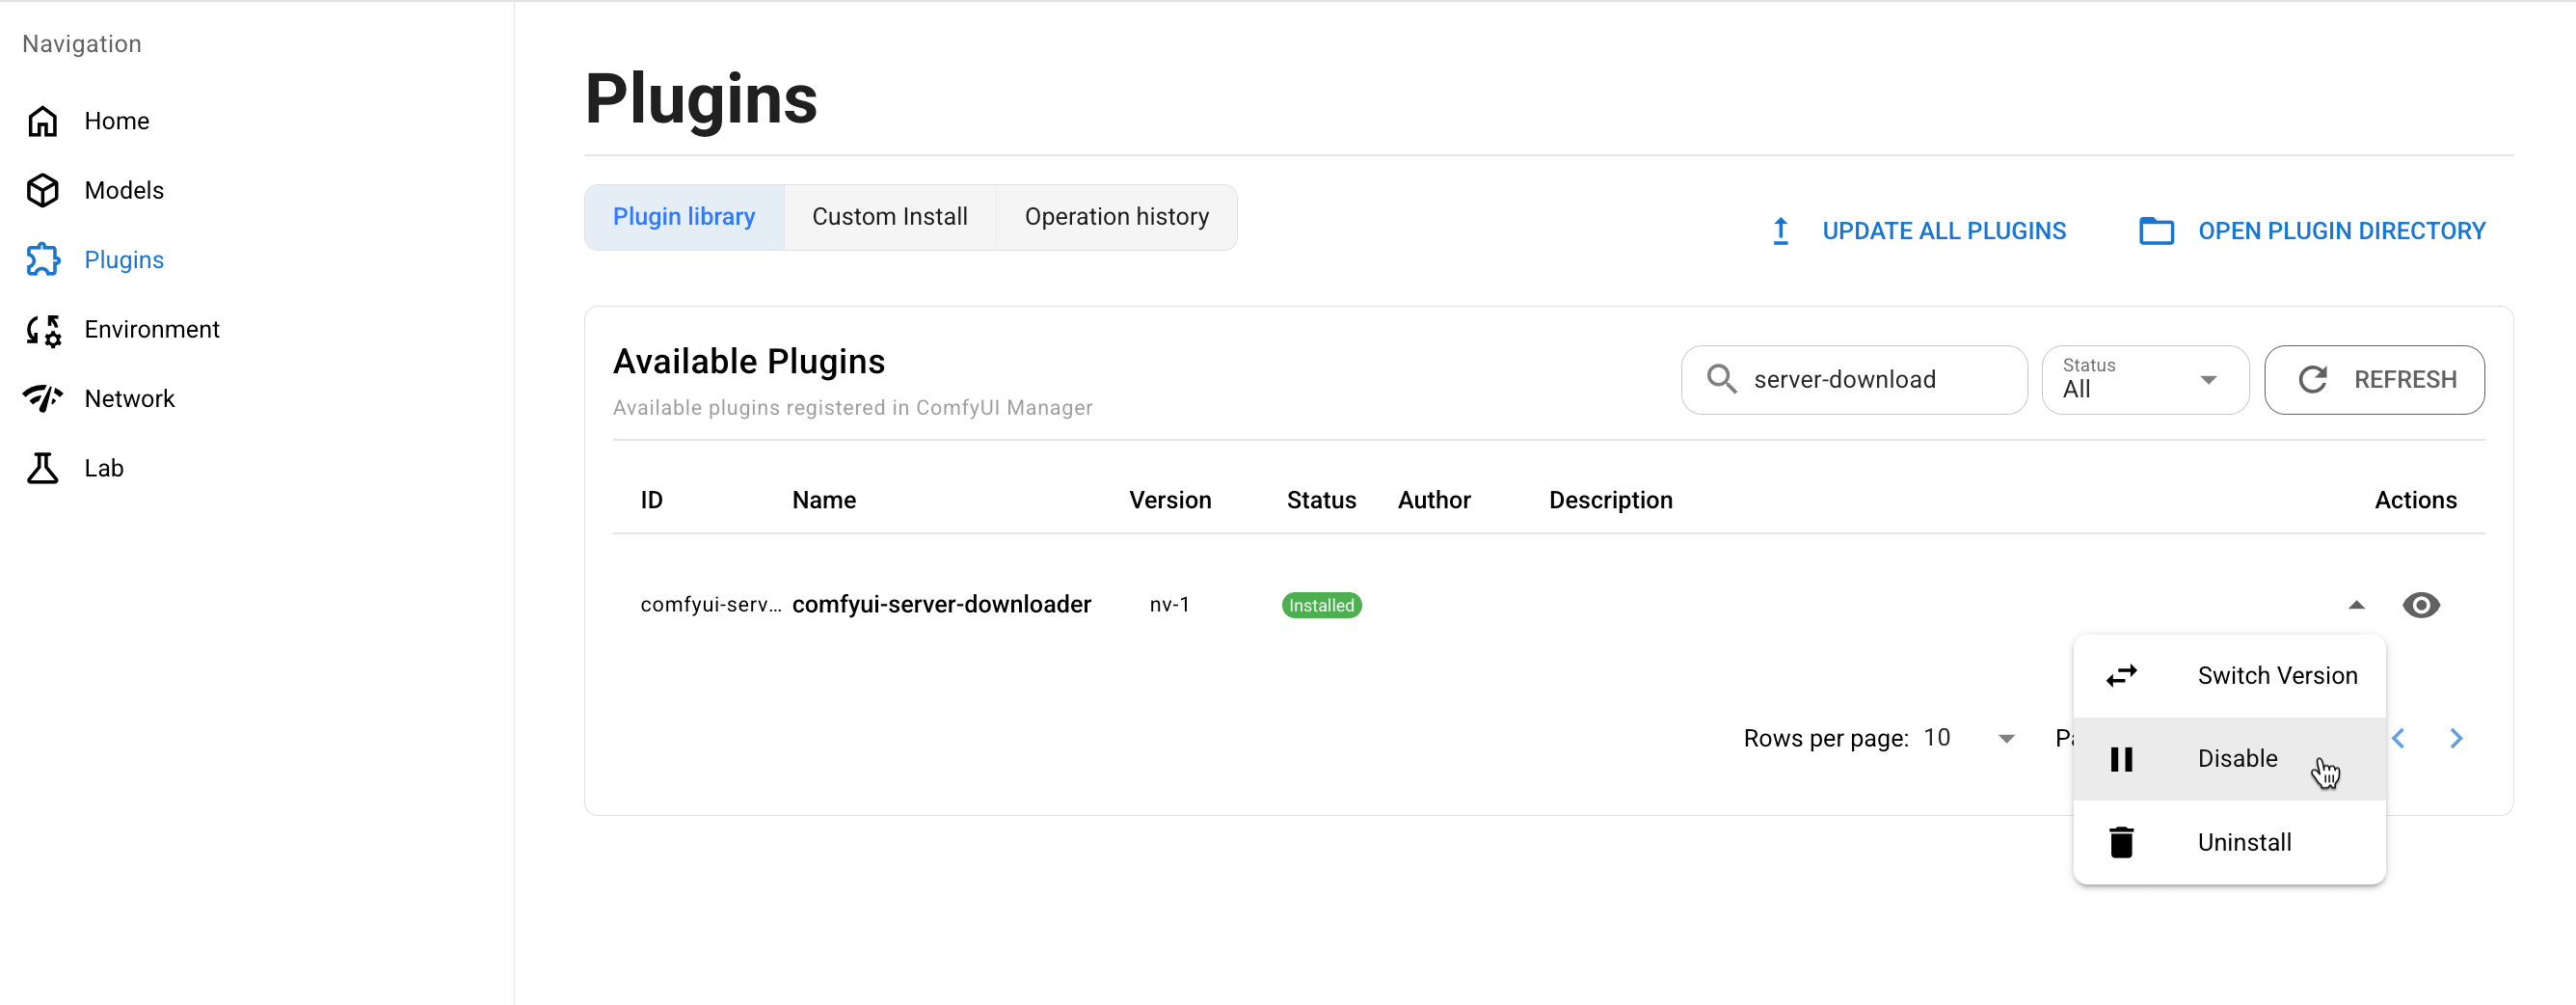
Go to the Home tab and click RESTART to apply the changes.
Once the service restarts, the Server Download button will no longer appear in the ComfyUI client.
Manage environment
ComfyUI runs on a set of Python libraries. Manage them on the Environment page.
Install Python packages
Go to Environment > INSTALL NEW PACKAGE.
In the pop-up window, enter the package name and version number (optional), and then click INSTALL.

Manage installed Python packages
Go to Environment.
Under the Installed Python packages tab, find the Python library you want to manage.
Click the arrow_upward button on the right to update the library, or the delete button to remove it.

Analyze dependency installation status
Go to Environment > Dependency analysis.
Click ANALYZE NOW to start analyzing.
From the plugins list on the left, find the problematic plugin highlighted in red, and click on it.
From Dependency list, find the missing library for the plugin, and click the Install button on the right. You can also click FIX ALL to automatically install all missing libraries.

Troubleshooting flow
Use the following flow when you encounter an issue and need a general recovery path.
TIP
For symptom-specific solutions such as ComfyUI cannot start, models cannot be downloaded, or high CPU temperature, see Common issues first.
Check dependency conflicts
If problems start after installing new plugins, the issue may be caused by dependency conflicts.
Run a dependency analysis to identify and fix the problem. For detailed steps, see Analyze dependency installation status.
Reset ComfyUI configuration
If the issue is still not resolved after the checks above, reset ComfyUI to its initial state.
Perform with caution
Resetting ComfyUI is irreversible. All plugins, custom configurations, and Python dependencies will be removed. Models stored in the shared model folder are not affected.
Get diagnostic details
If you plan to contact support, export your ComfyUI logs before resetting. See Collect information for support.
To reset ComfyUI:
In ComfyUI Launcher, go to Home and click more_vert in the upper-right corner, then click Wipe and restore.
In the prompt window, click WIPE AND RESTORE.

Enter
CONFIRM, then click CONFIRM.
After the reset completes, restart ComfyUI for the changes to take effect.
Reinstall ComfyUI completely
If the issue persists after wipe and restore, uninstall and reinstall ComfyUI completely.
- Go to Market > My Olares.
- Click the dropdown arrow next to ComfyUI's operation button and select Uninstall.
- In the Uninstall window, select Also remove all local data, then click Confirm.
- Open Files from the Launchpad and go to
External/olares/ai. - Delete the
comfyuifolder. - Reinstall ComfyUI from Market.
- Once installation is complete, open ComfyUI Launcher and start the service.
Collect information for support
If you cannot resolve the issue and need to escalate it to the support team, prepare the following diagnostic information.
Export ComfyUI logs
Logs contain the backend running status and error traces.
In ComfyUI Launcher, go to Home and click more_vert in the upper-right corner, then click View logs.

Click the refresh button to ensure you have the latest output.
Click the download button to save the log file.

Optional: Get the workflow error report
If a specific workflow failed, include a screenshot of the workflow error report to help the support team identify the problem.
In the ComfyUI client, click Active to open the Job Queue.
Select the failed task from the list.
Click Report error, then click Show Report to expand the details.
